Step 1 of 11
Open Automation
Open Apple Shortcuts, tap Automation, then New Automation. If rules already exist, tap +.
Configure this in the Shortcuts app.
Turn matching new messages into order drafts you can review.
New message → Shortcuts passes the text → DuePair saves a draft and notifies you
Create the personal automation yourself in Shortcuts. DuePair only processes the input it receives; it does not read your message or mailbox history.
Each tutorial demonstrates just “balance”. Receive one draft first, then add other words only if you need them.
Suggested words: additional payment, balance, deposit, pre-order, reservation. You can use your own word, such as figurine or a product name. Choose words your sellers actually use, in any language; you do not need all the suggestions.
Message rules match message content. The email rule in this tutorial matches the subject.
Pass the content of new messages containing “balance” to DuePair.
Step 1 of 11
Open Apple Shortcuts, tap Automation, then New Automation. If rules already exist, tap +.
Configure this in the Shortcuts app.
Step 2 of 11
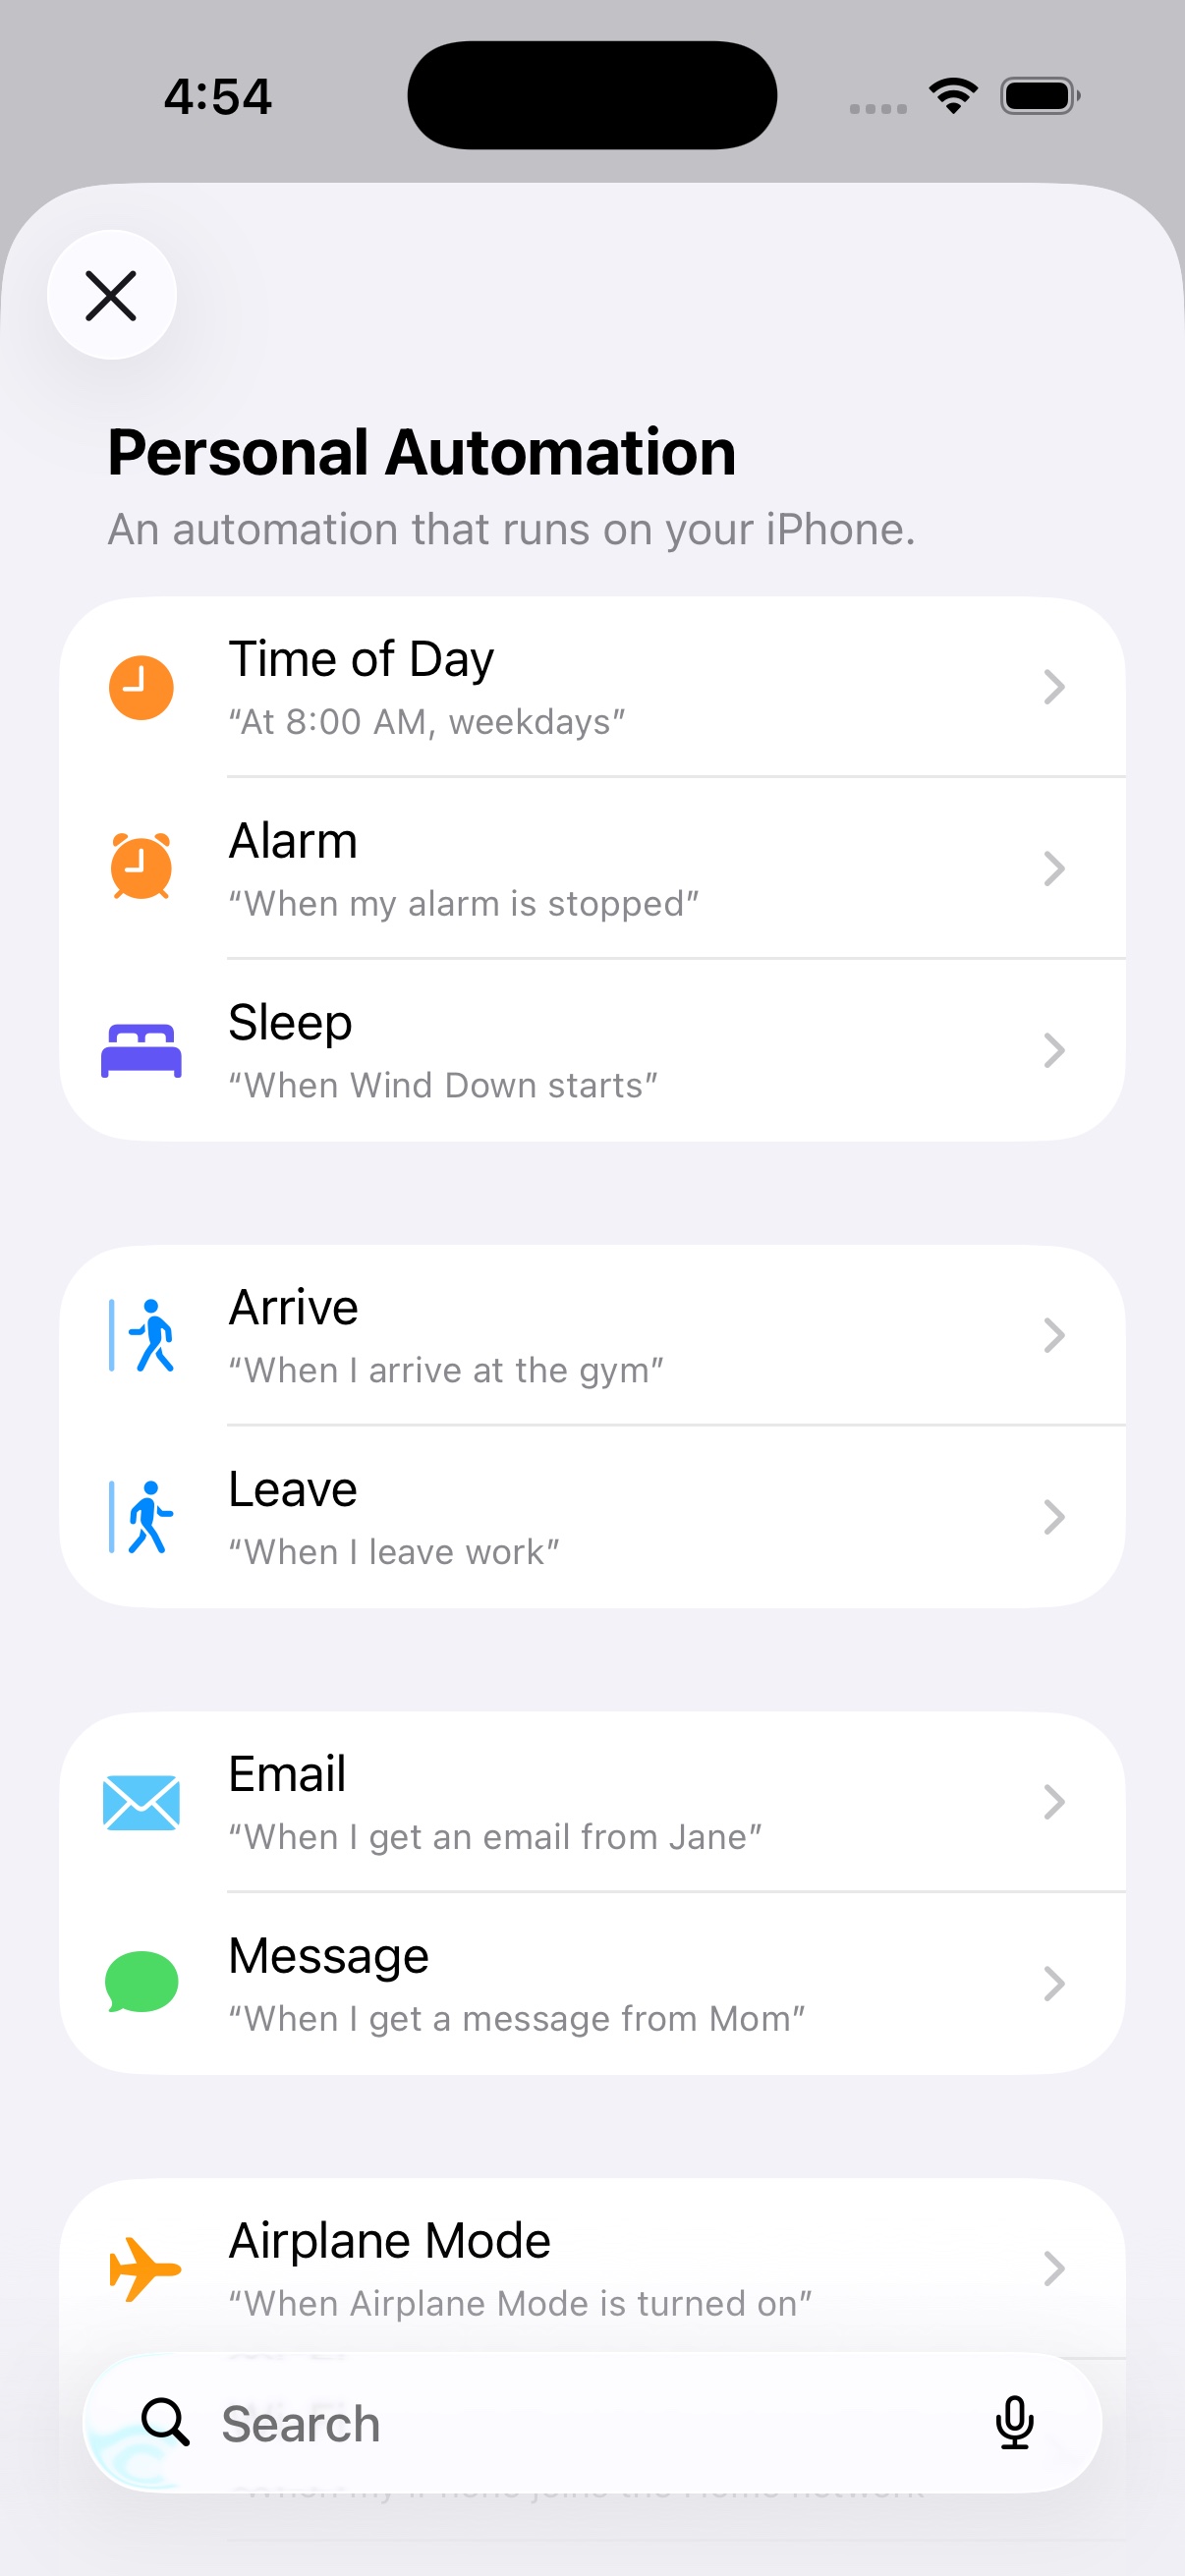
Choose Message from the personal automation triggers.
This means Apple Messages, not other chat apps.
Step 3 of 11
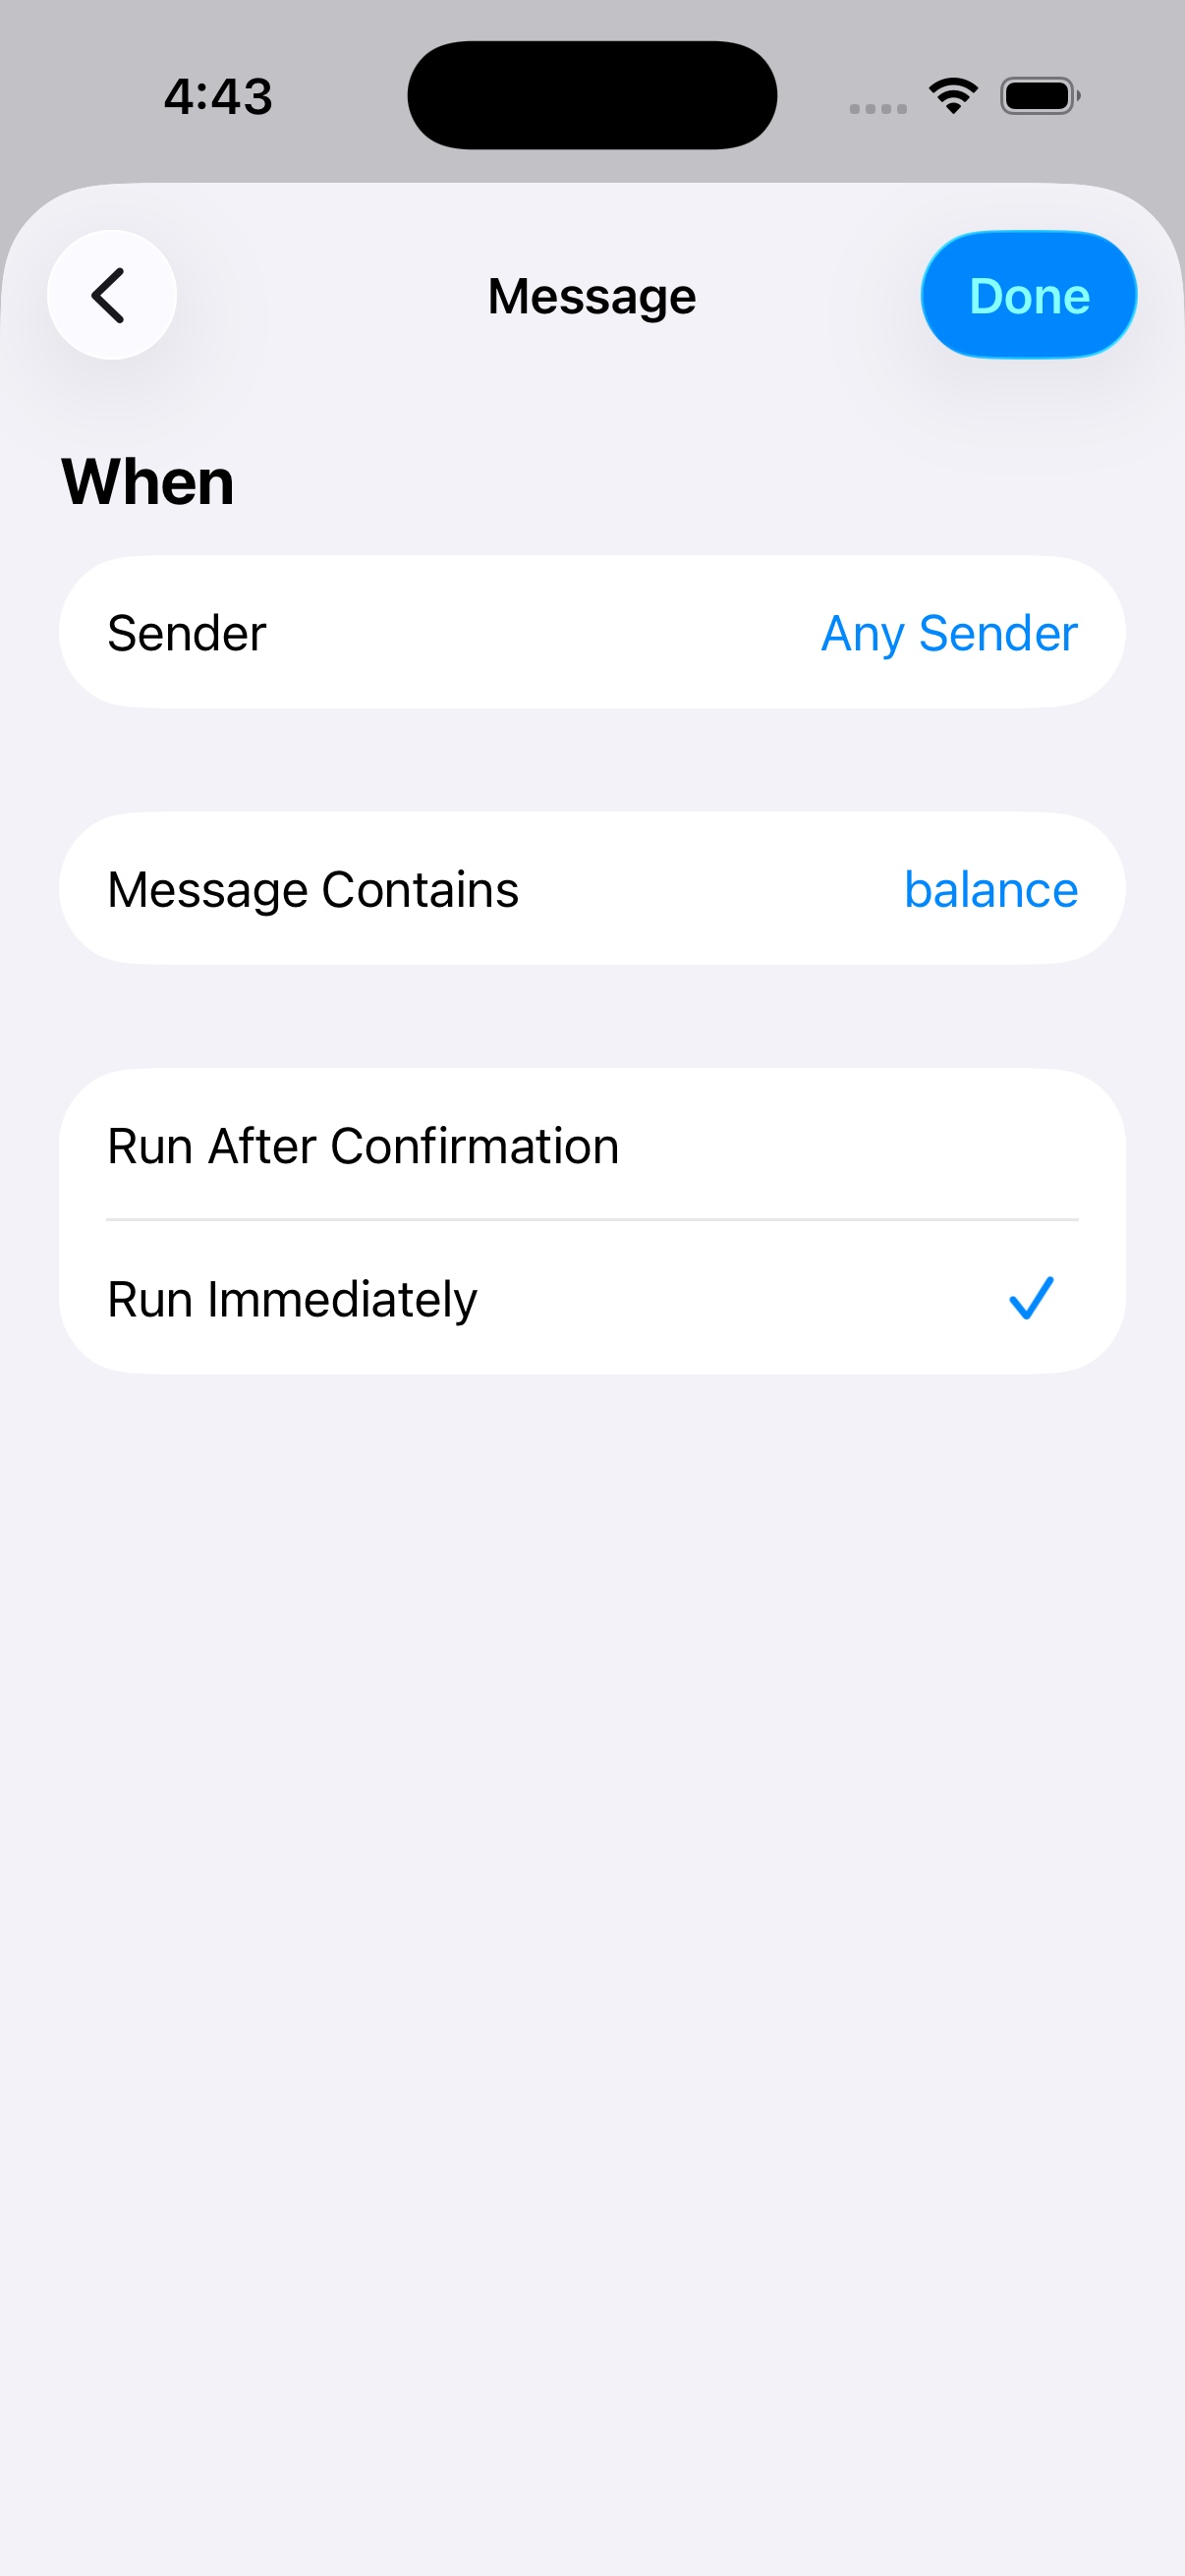
Next to Message Contains, tap Choose and enter “balance”. Tap Done. Leave the sender as Any Sender.
You can use a product name or another word instead. Do not enter a comma-separated list here.
Step 4 of 11
Confirm Message Contains is “balance”, select Run Immediately, and tap Next.
The system runs the automation when a new message meets its conditions. New automations show Next; editing a saved rule may show Done, as in this screenshot.
Step 5 of 11
Tap Create New Shortcut to open the action editor.
Stay inside this automation; do not create a separate shortcut without a trigger.
Step 6 of 11
Search actions for “SMS” and select Recognize order message with the DuePair icon.
If it is missing, open a supported version of DuePair once, then search again.
Step 7 of 11
Tap the Message text input in the DuePair action, then Select Variable above the keyboard or at the bottom.
Do not type “balance” or a fixed message here. The input must come from each new message.
Step 8 of 11
Select the blue Shortcut Input variable. It represents the message that triggered this automation.
Select the variable itself; do not type its name.
Step 9 of 11
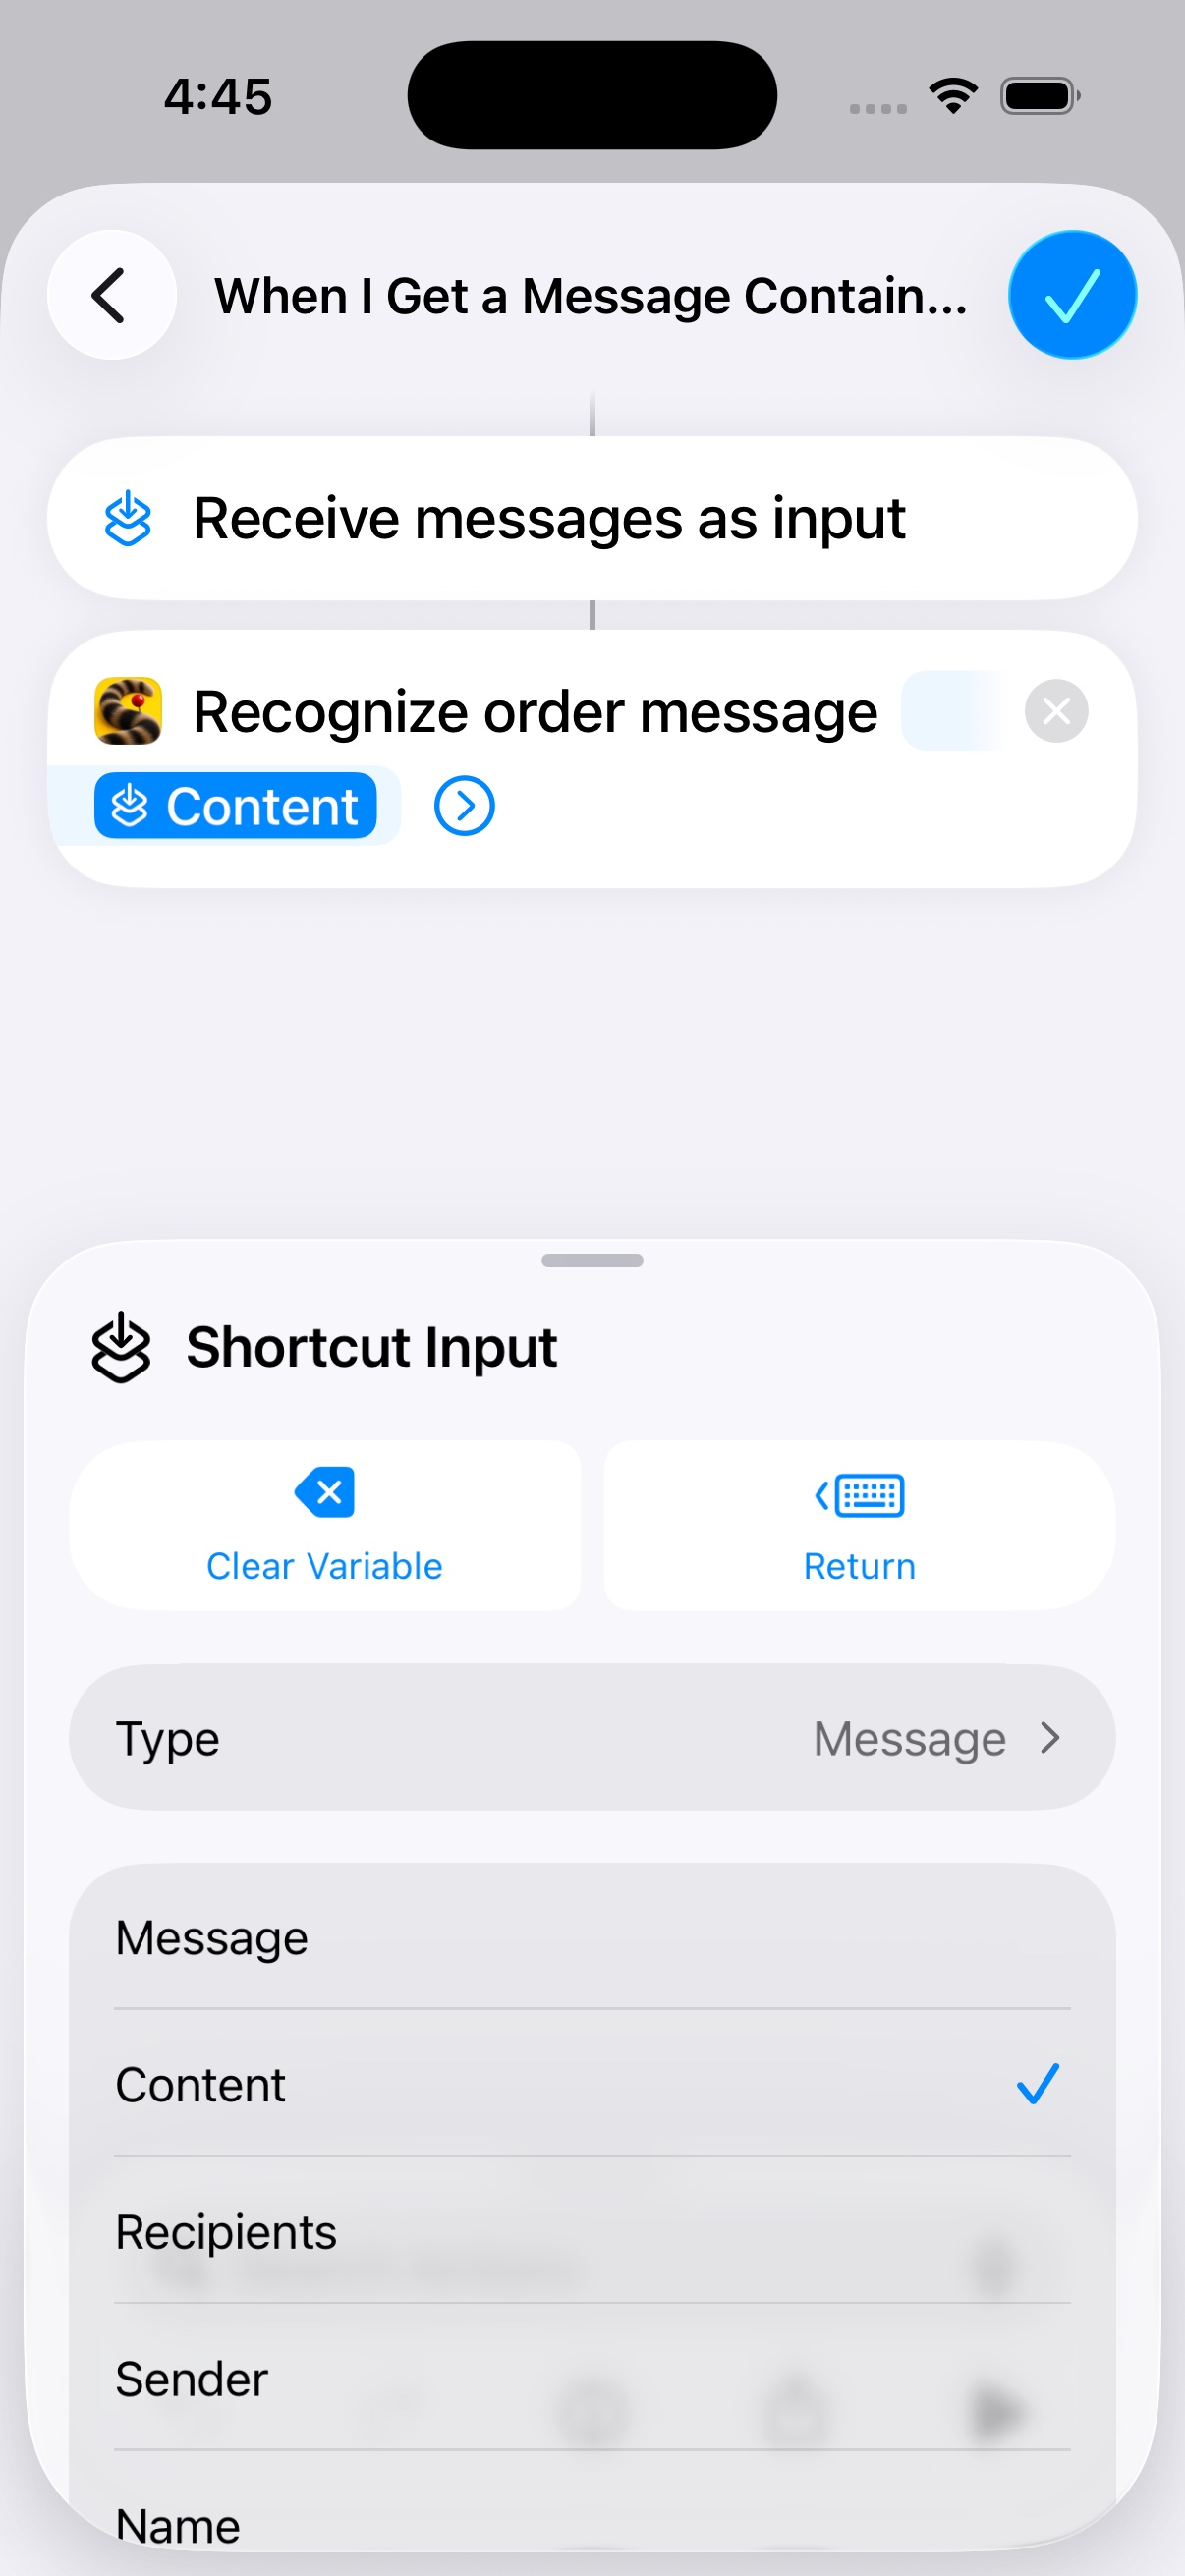
Tap the inserted variable. Check that its type is Message, then select Content.
Use the message body, not the sender or recipient.
Step 10 of 11
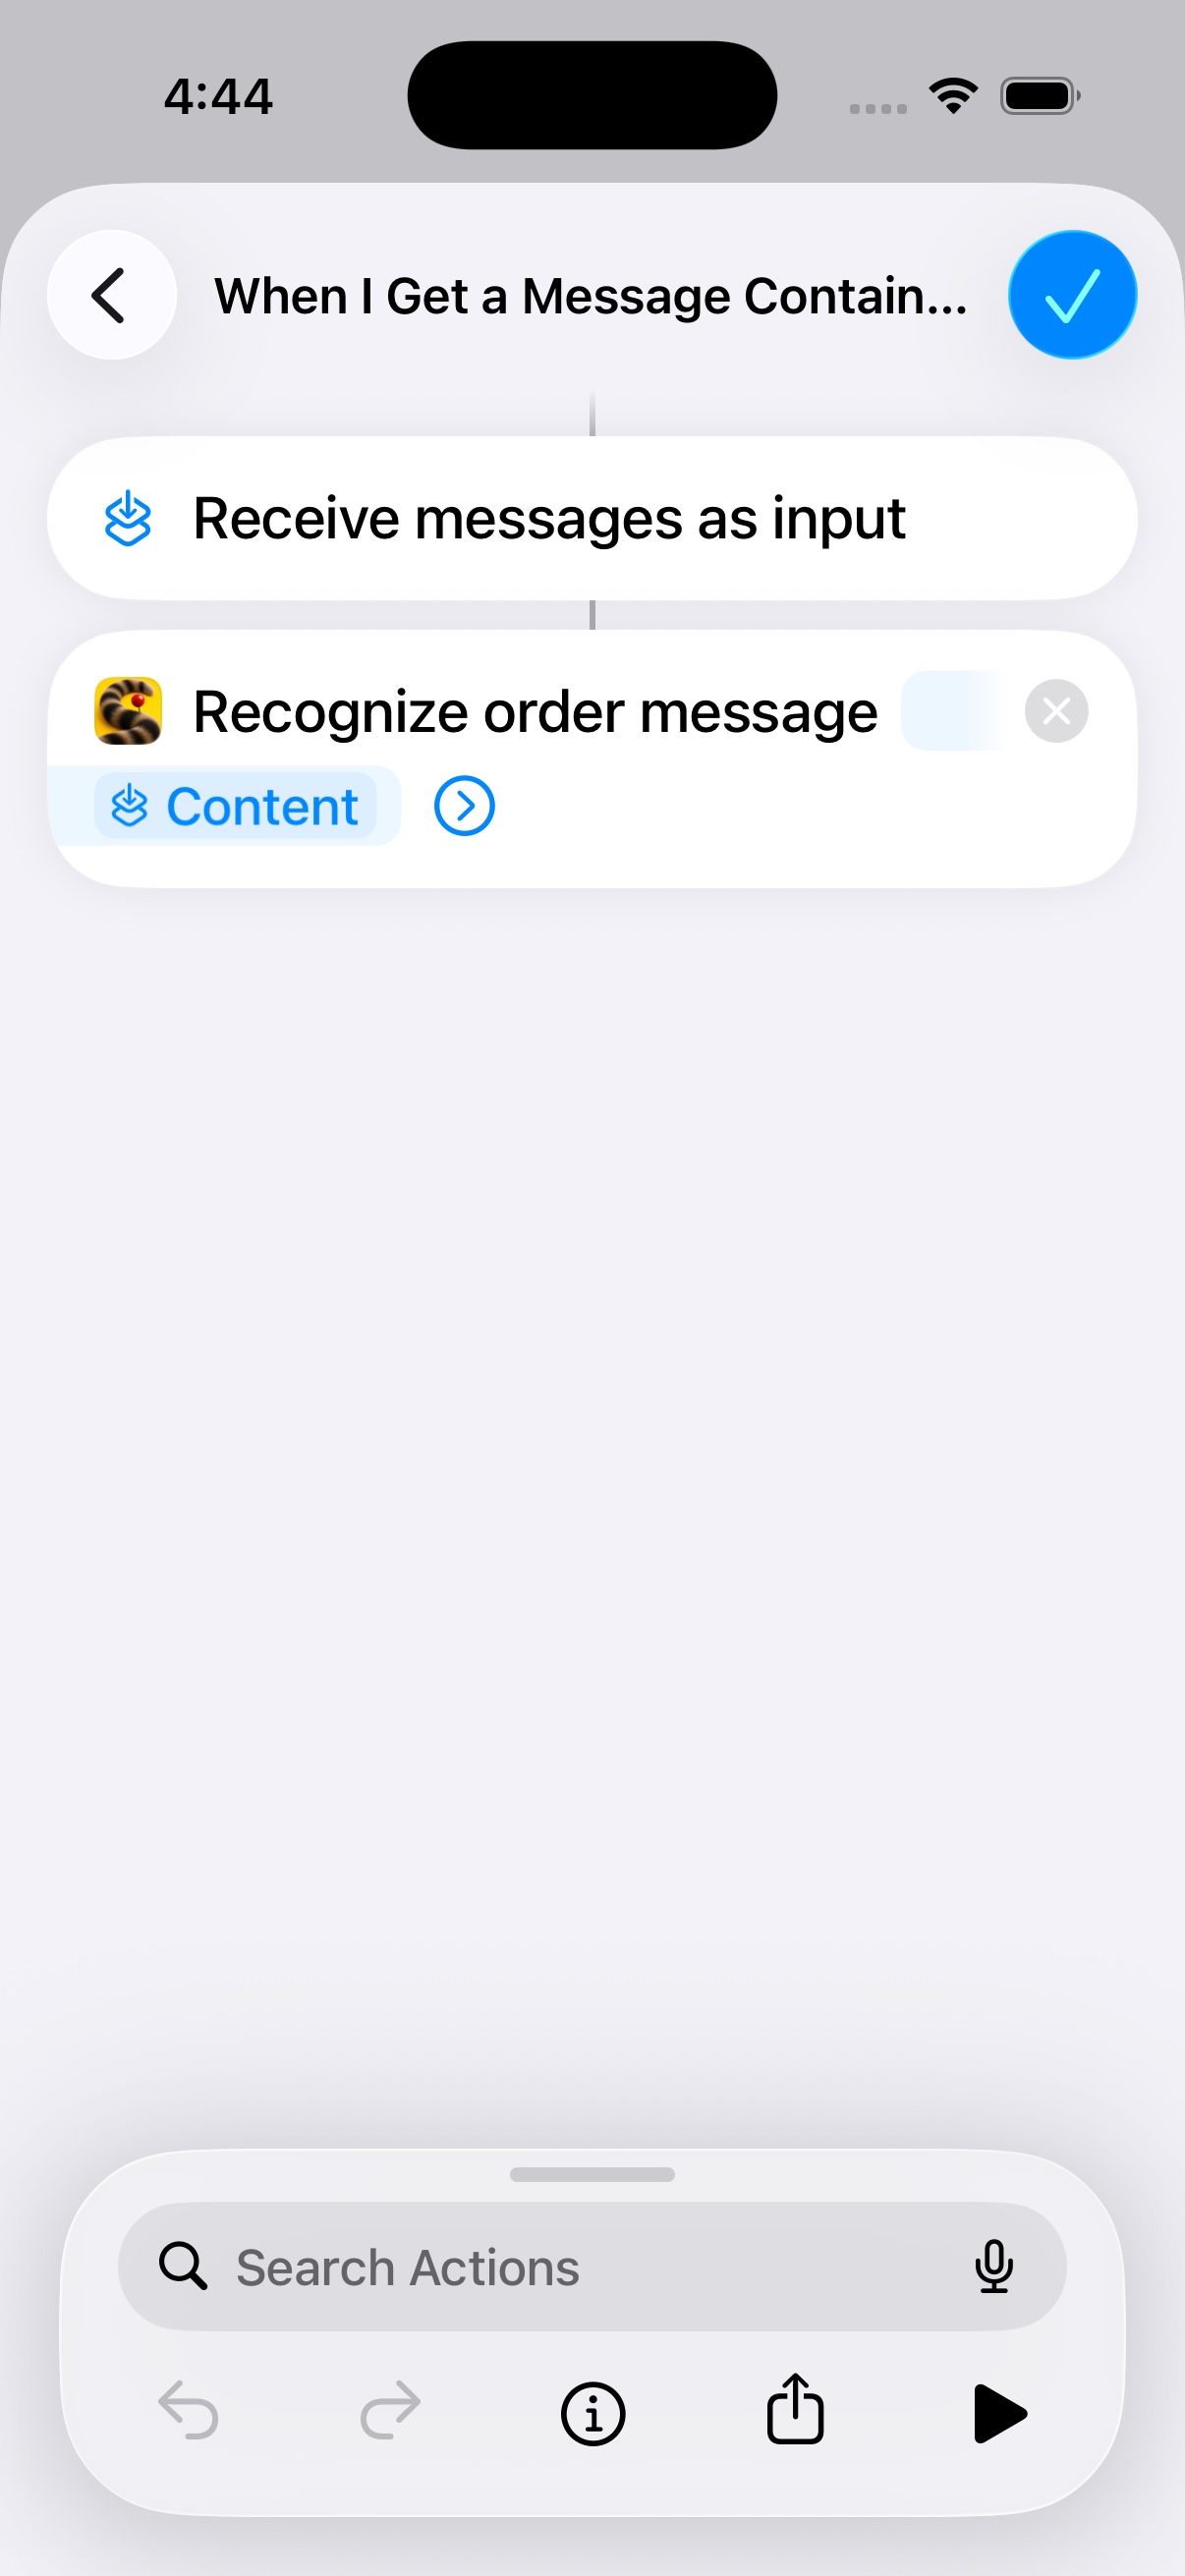
Return from the variable panel and dismiss the input toolbar. Keep one DuePair action with the blue Content variable, then tap the checkmark.
For a single keyword, leave both “Keywords handled by other rules” and “Basic keywords handled by other rules” empty. No extra Show Notification action is needed.
Step 11 of 11
Back in Automation, check for a rule that receives messages containing “balance” and runs Recognize order message.
Messages and email are separate setups. If you only need messages, complete the test below; email setup is optional.
Have another phone send the text below.
Test figurine: remaining balance 280.
Check the DuePair notification and Records → Drafts. One saved draft confirms the setup. Incomplete information is still kept for your review; delete drafts you do not need.
This example has no date. Review the amount and add the real dates before saving a tracked order and setting reminders. Receiving the same text again in a separate message should create another draft; you do not need to change the text.
Match “balance” in the subject, then process each email’s subject and body separately.
Step 1 of 12
Open Apple Shortcuts, tap Automation, then New Automation or +.
Configure this in the Shortcuts app.
Step 2 of 12
Choose Email from the automation triggers.
First add your mailbox to Apple Mail and check that new email arrives.
Step 3 of 12
Tap Choose next to Subject Contains, enter “balance”, and tap Done. Leave the sender as Any Sender.
A custom word or product name is also fine. A word that appears only in the body will not trigger this subject rule.
Step 4 of 12
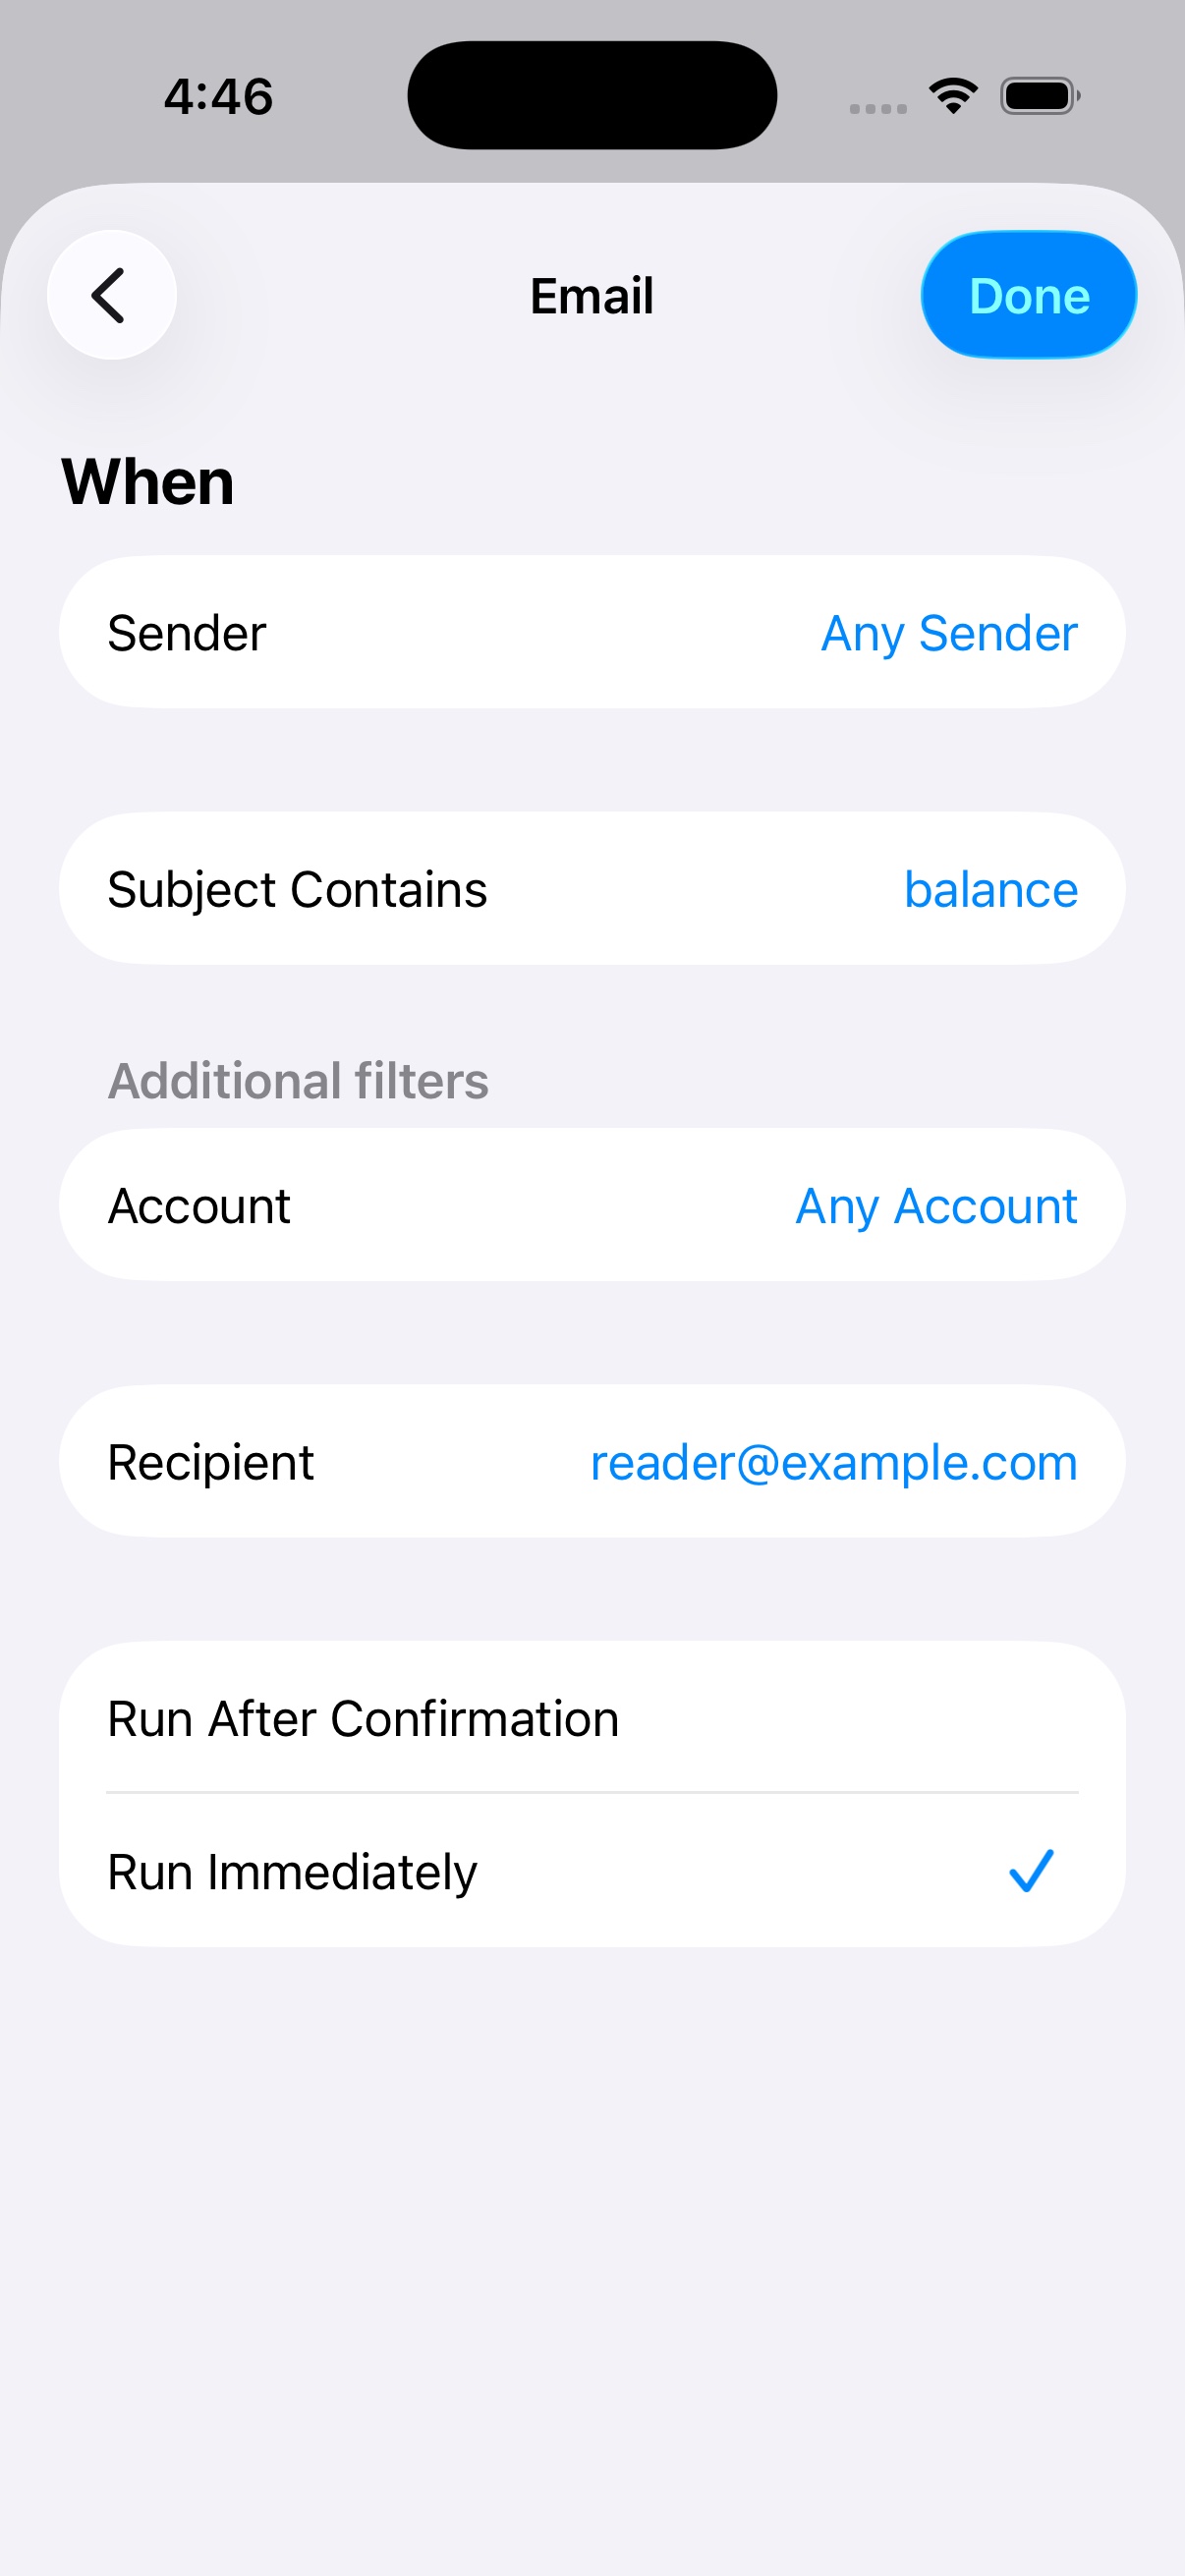
For Recipient, enter your own email address where you receive order updates—not the seller’s address. Replace [email protected] with your address. Keep Any Sender and Any Account, choose Run Immediately, then Next.
New automations show Next; editing a saved rule may show Done. Your mailbox must already receive email in Apple Mail.
Step 5 of 12
Tap Create New Shortcut. Search actions for Repeat with Each and add it; it is also in Scripting under Control Flow.
Several emails may arrive together. Repeating over them prevents two emails from becoming one draft.
Step 6 of 12
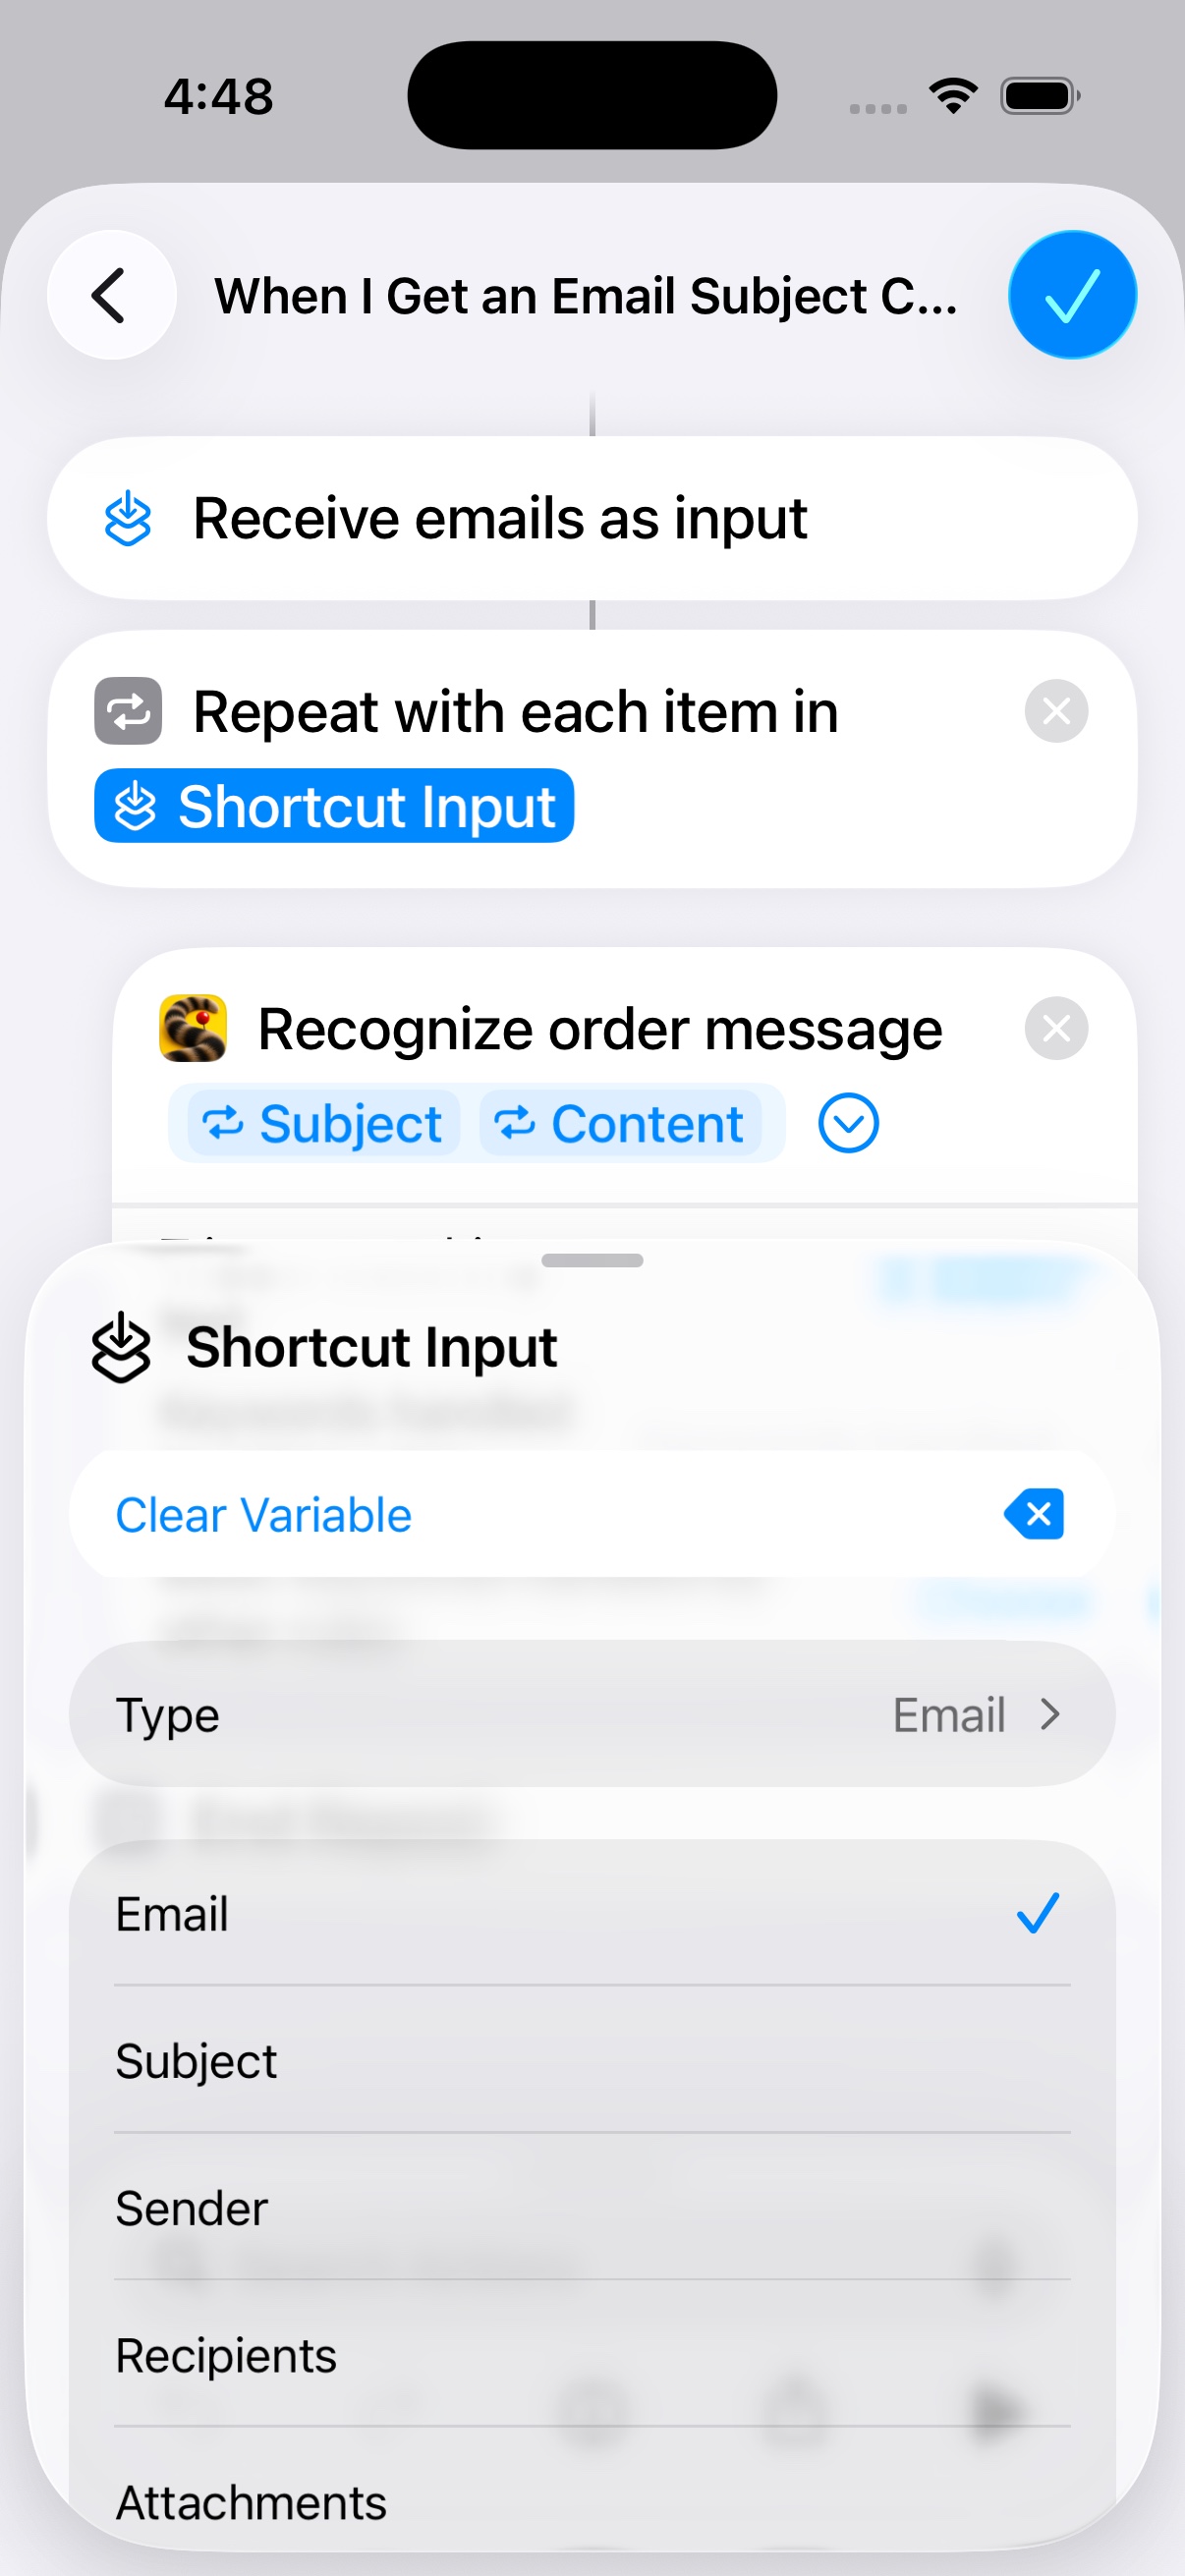
Set the Repeat input to the blue Shortcut Input variable. Keep the complete Email object; do not choose Subject or Content here.
The structure should be Repeat with Each item in Shortcut Input → End Repeat.
Step 7 of 12
Search for “SMS”, add Recognize order message, and place it between Repeat with Each and End Repeat.
If it appears below End Repeat, move it inside the repeat. The action handles email text too.
Step 8 of 12
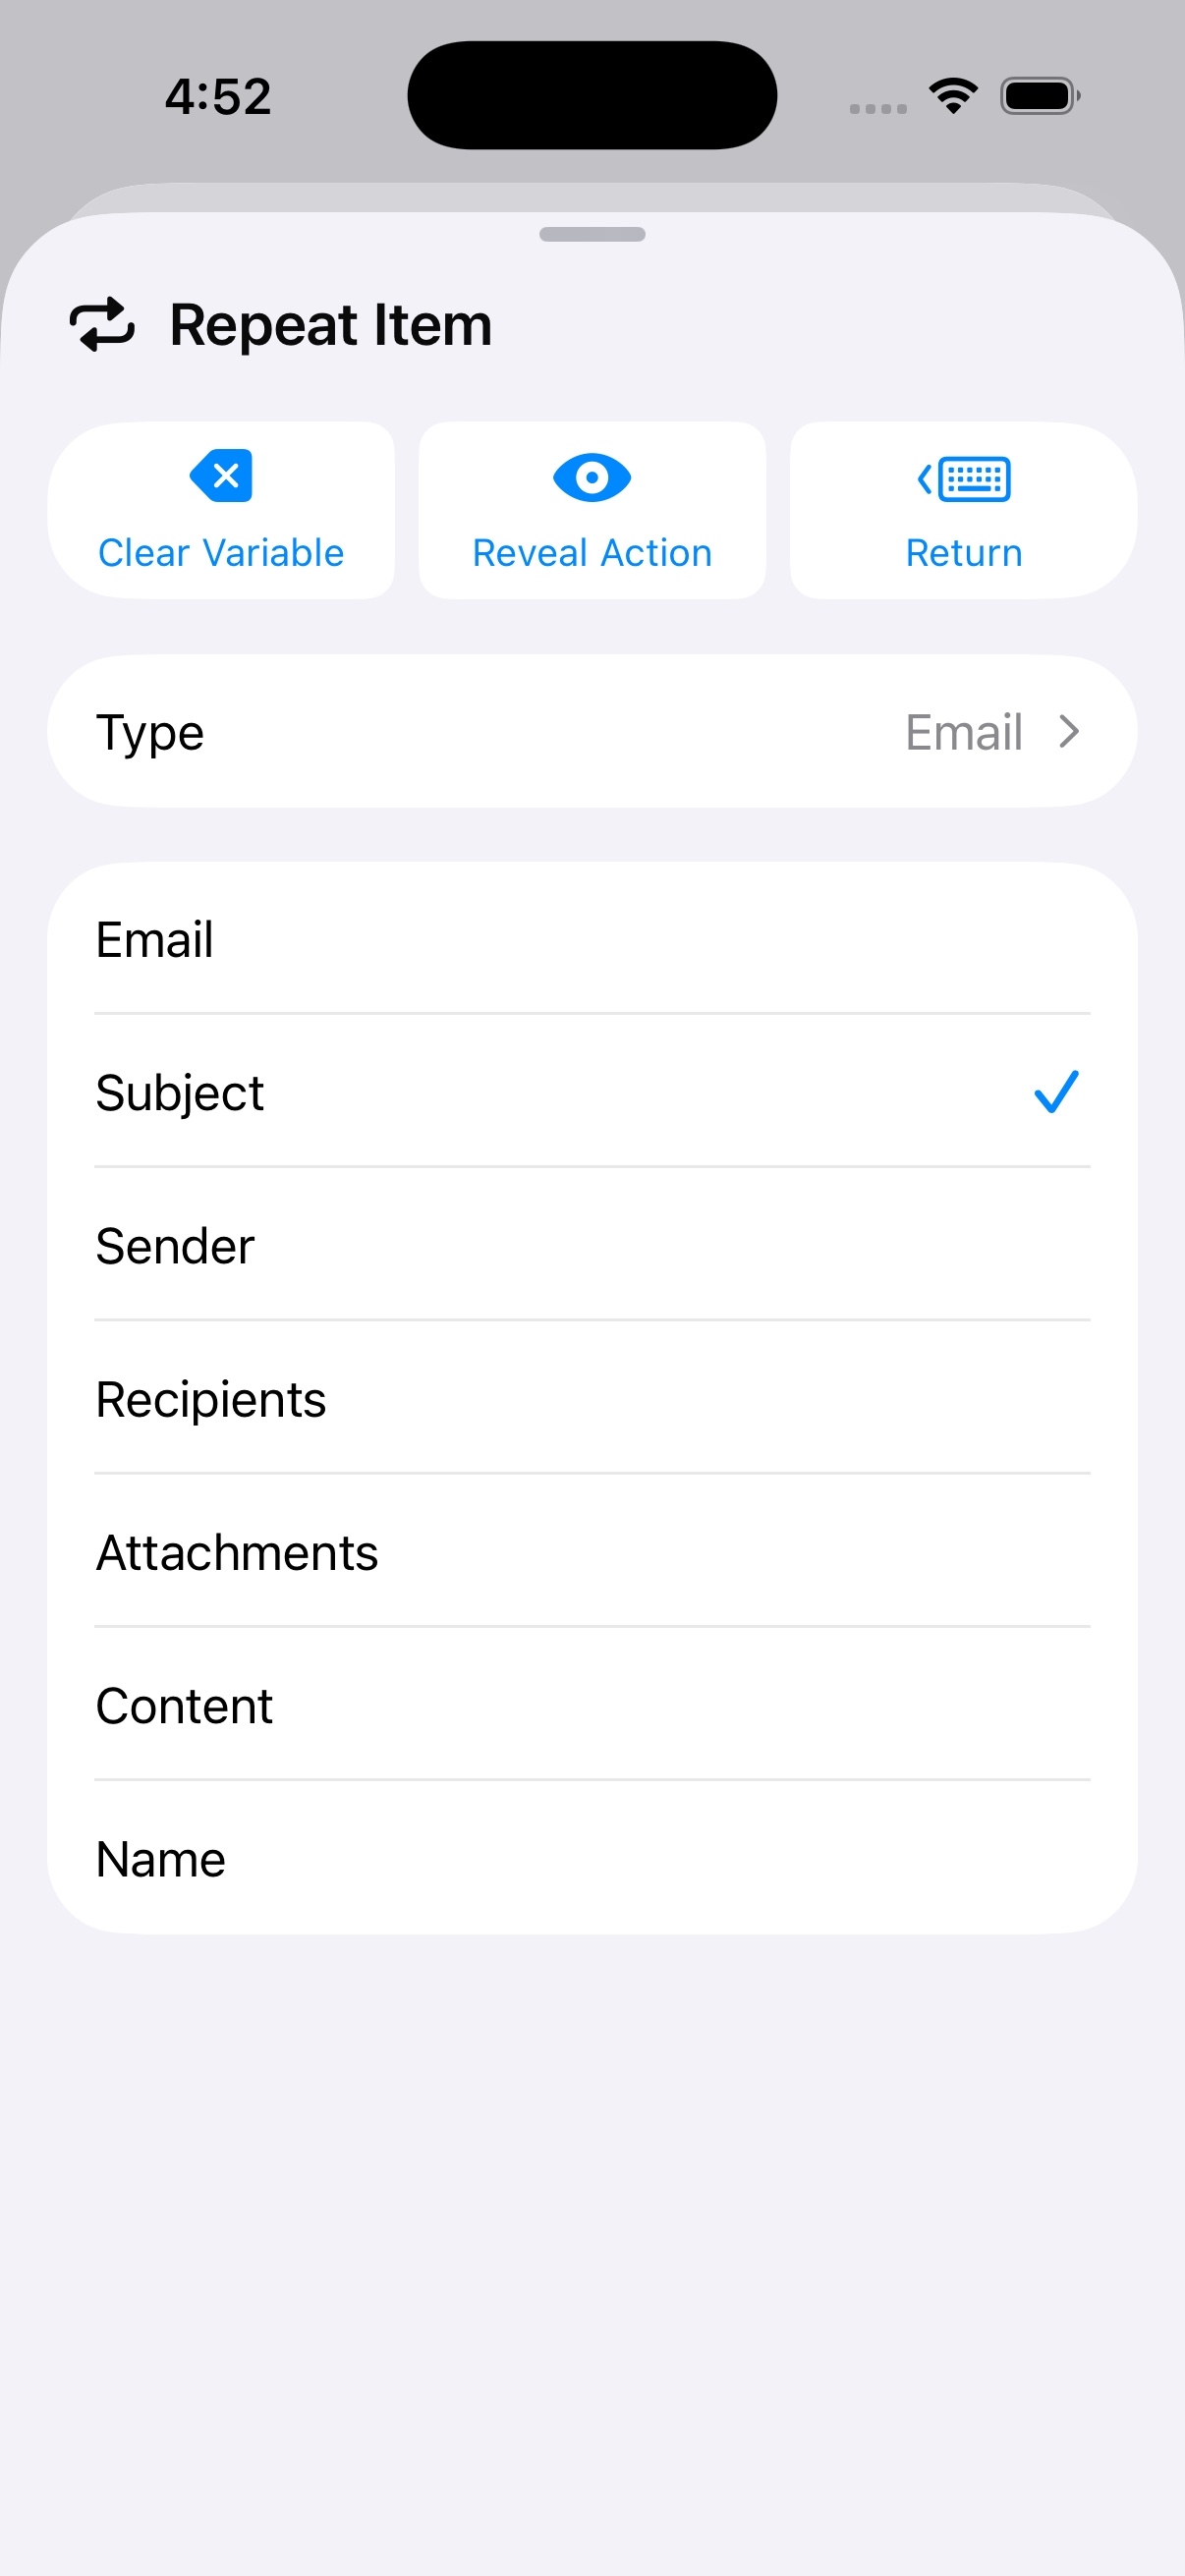
Tap the DuePair Message text input, choose Select Variable, and select Repeat Item. Tap the inserted variable, confirm Email as its type, and choose Subject.
Use Repeat Item, not Repeat Index or the entire Shortcut Input. Do not type a variable name as plain text.
Step 9 of 12
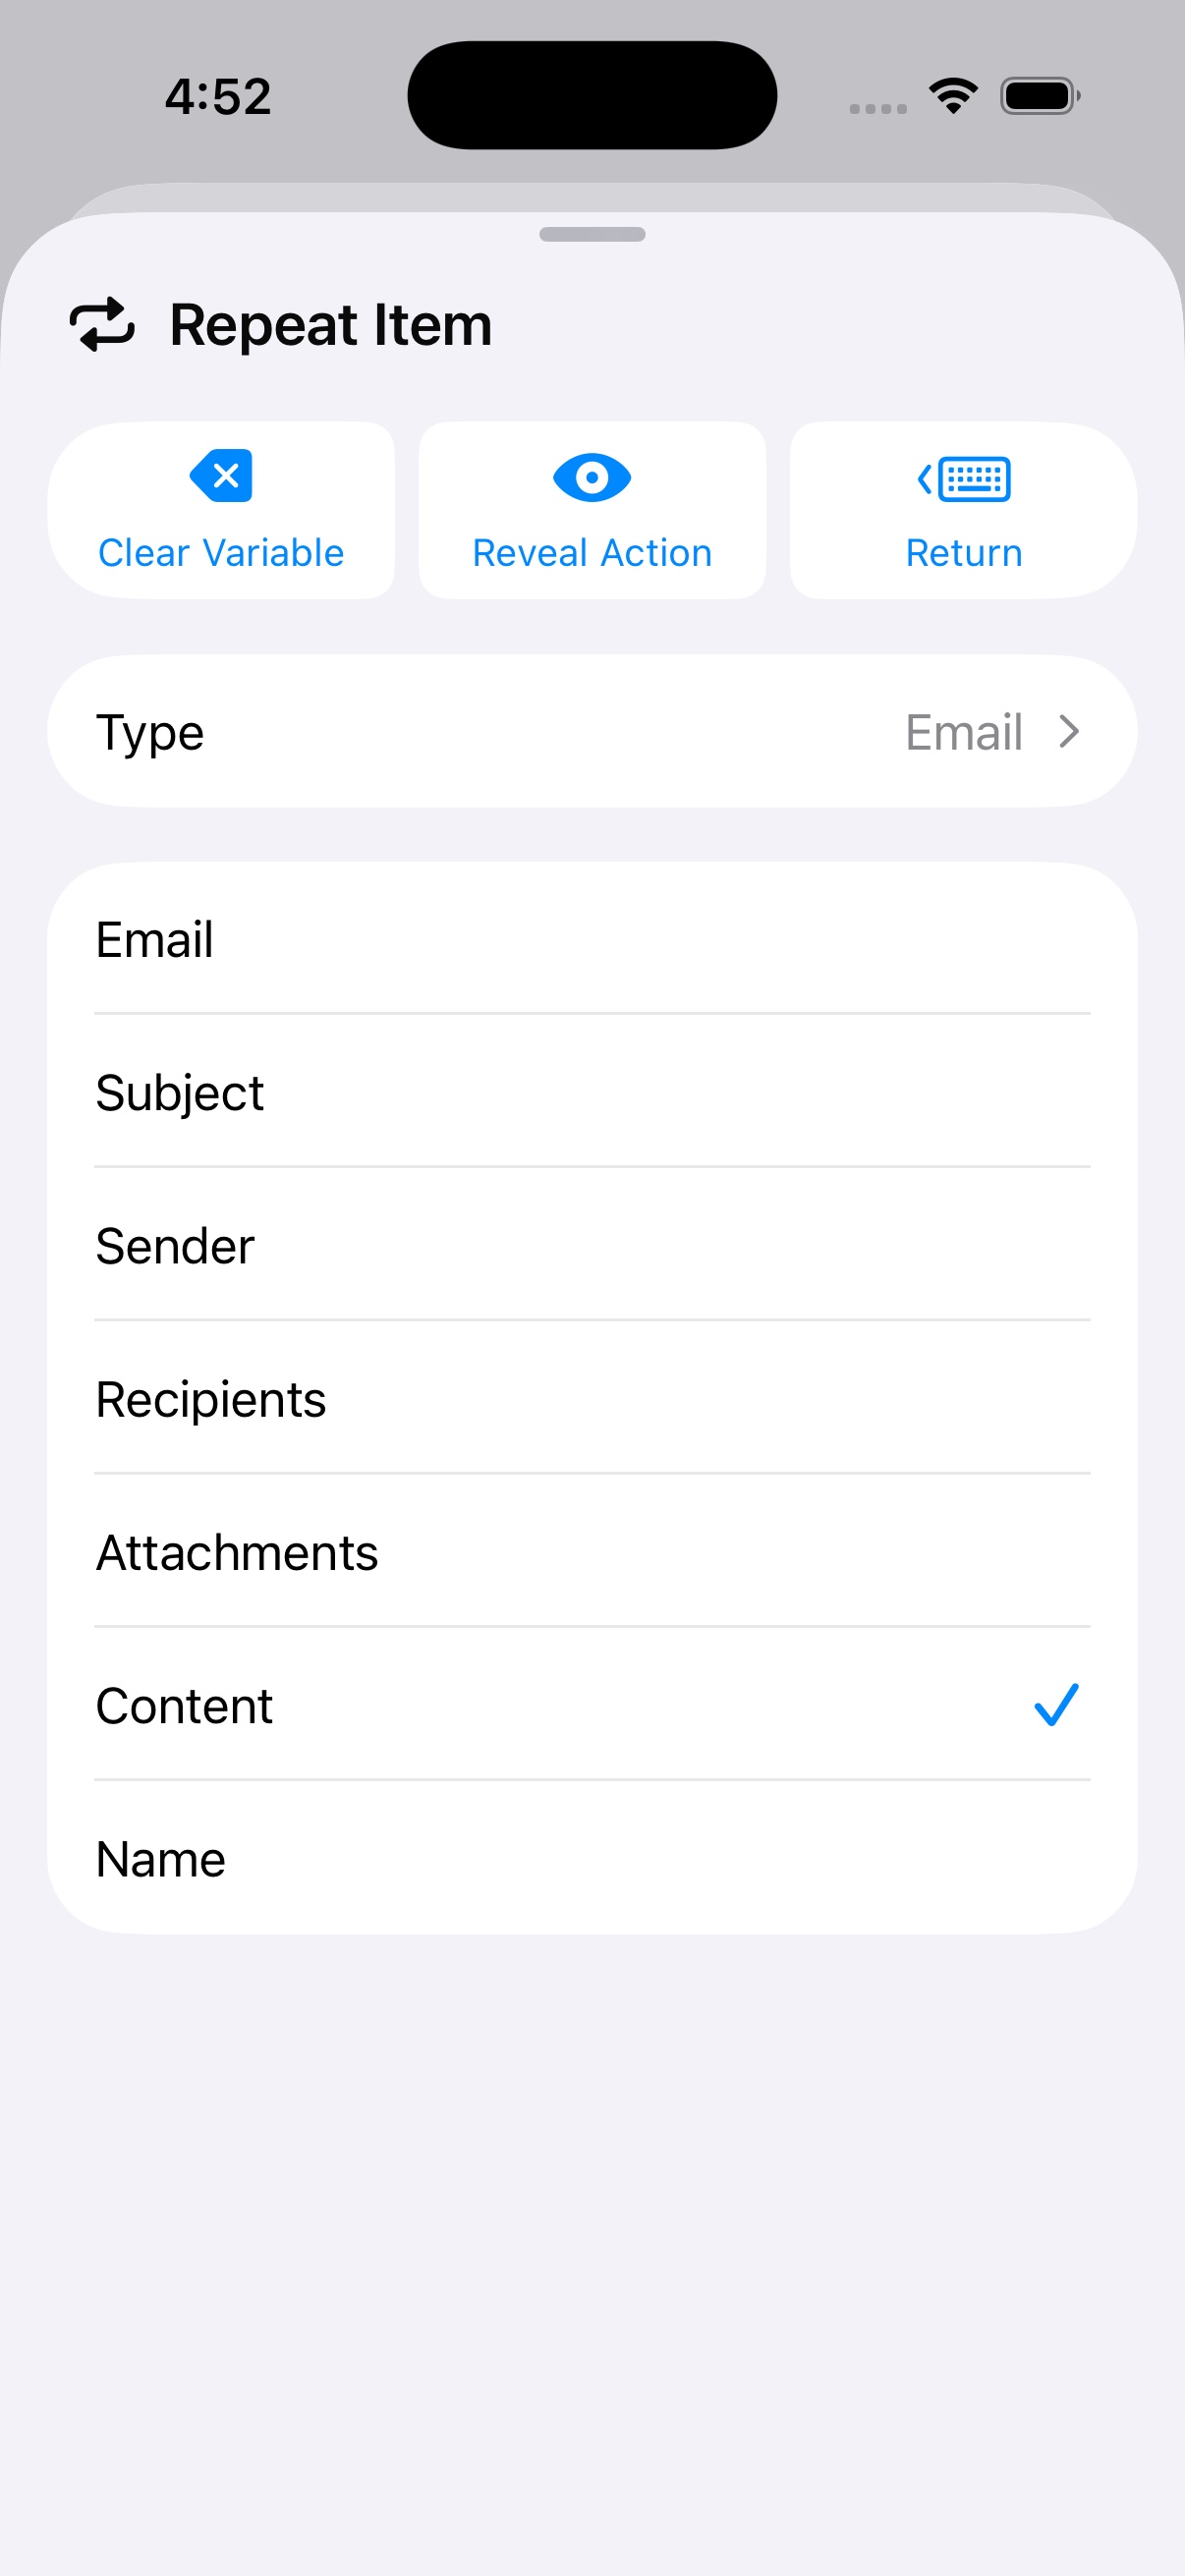
Return to the input, add a space after the subject variable, then insert another Repeat Item variable and set its property to Content.
You should have two blue variables: Subject and Content. Content is the email body; expand or scroll the property panel if it is hidden.
Step 10 of 12
Expand the DuePair action. Set Trigger matching text to Repeat Item’s Subject. Leave Keywords handled by other rules and Basic keywords handled by other rules empty.
Do not select suggested exclusions when you have only one rule: they could skip an email you want to save.
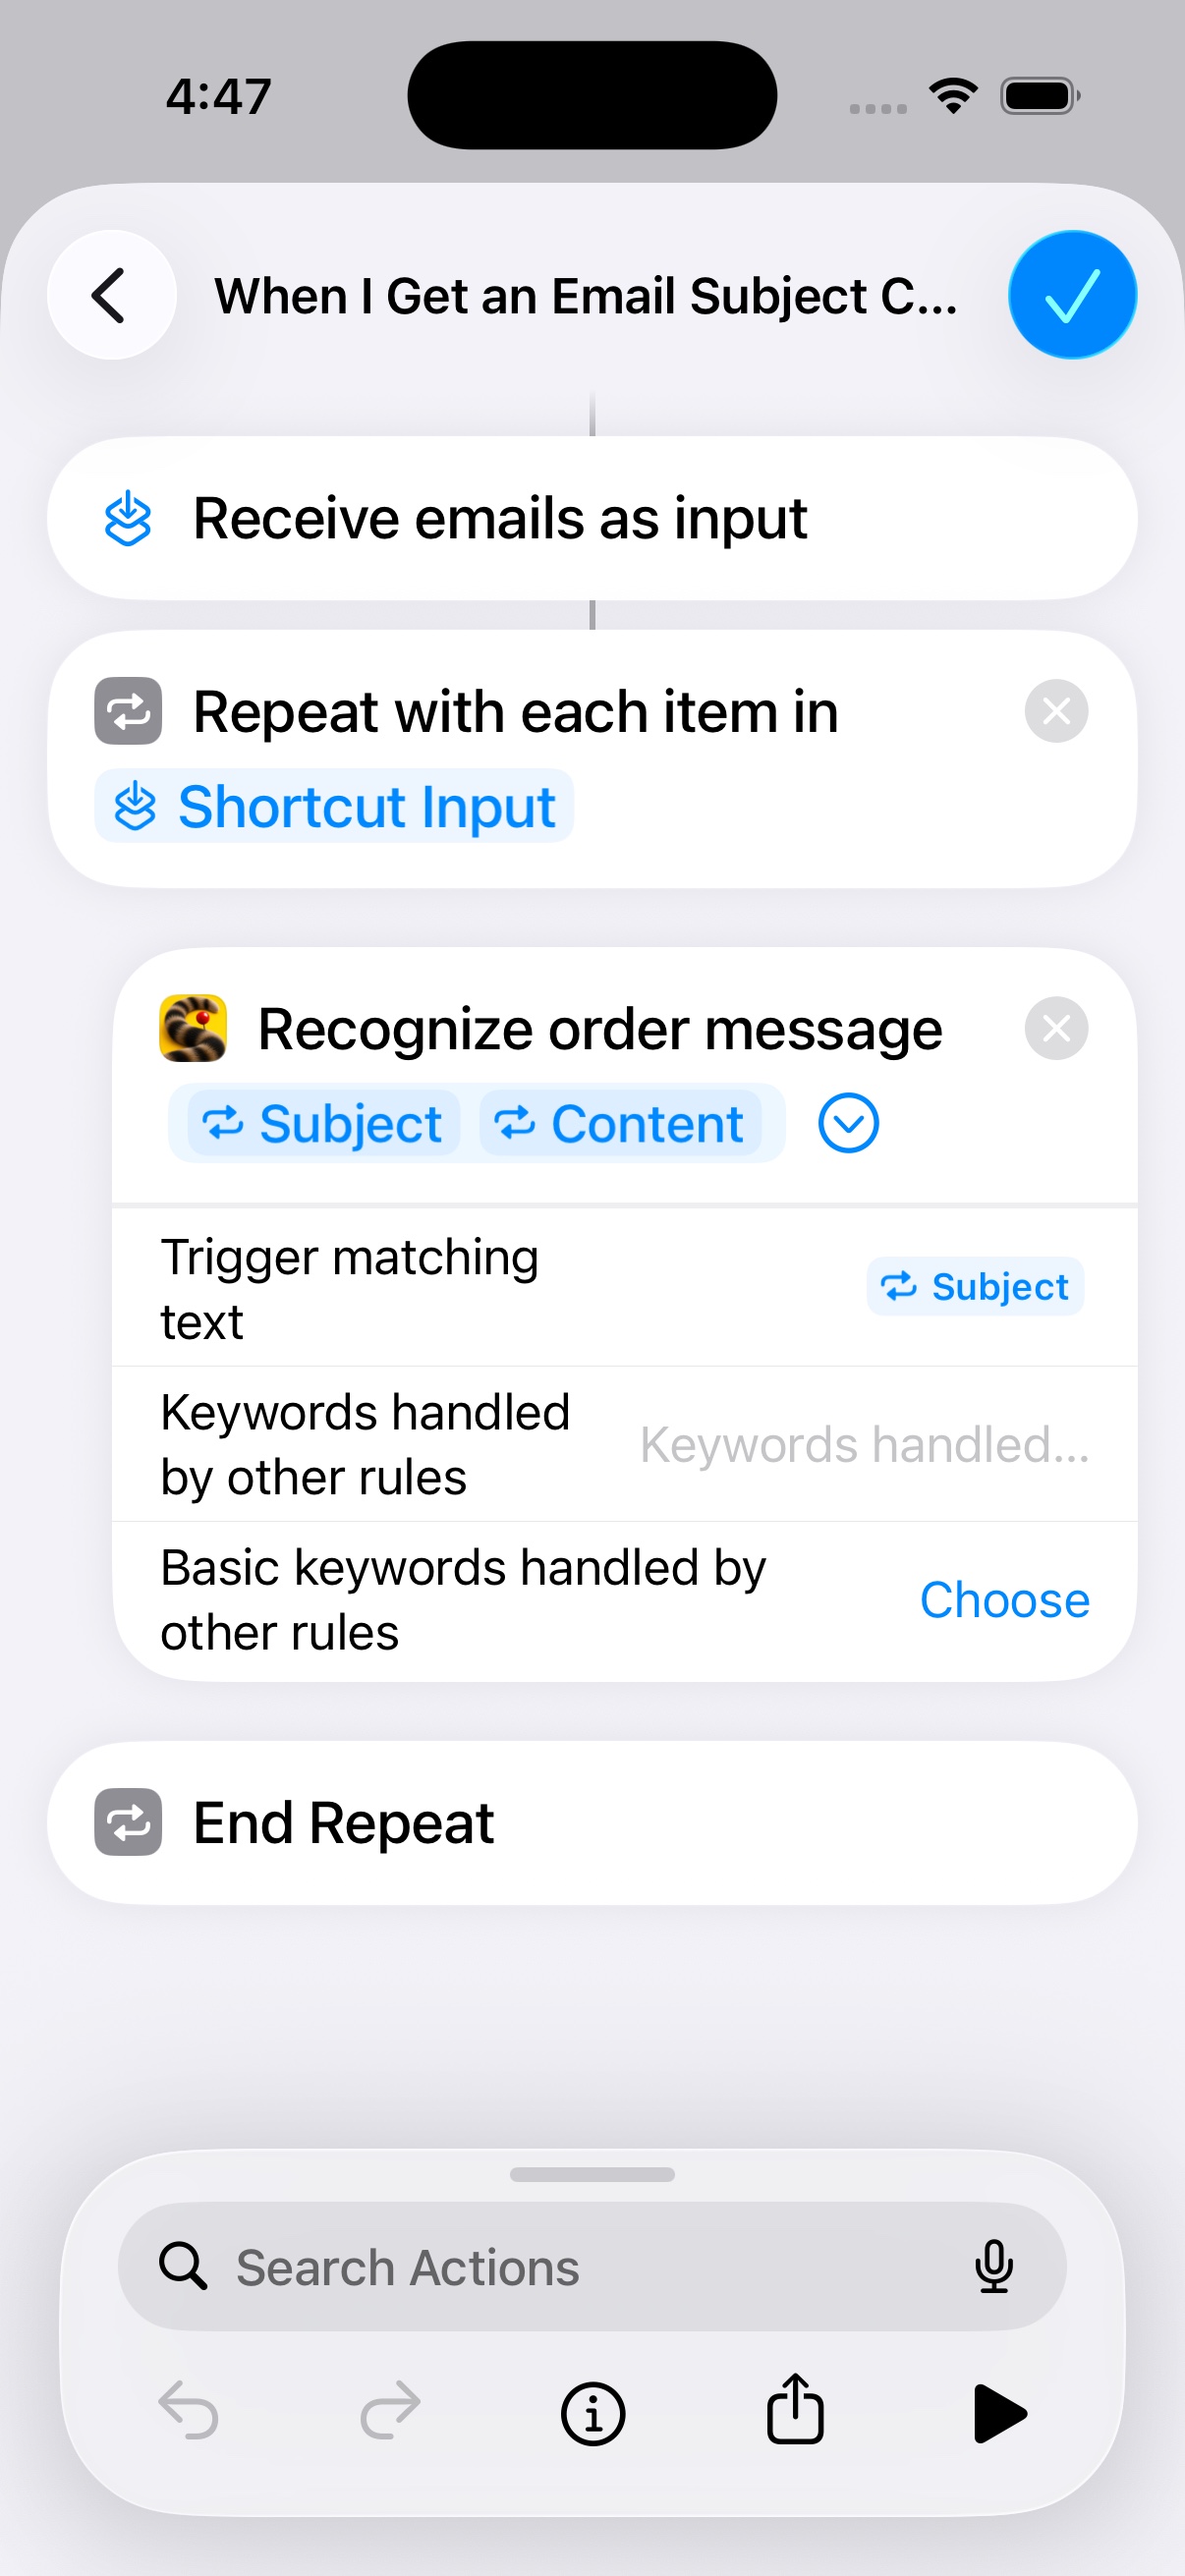
Step 11 of 12
Check the order: Repeat with Each → DuePair with Repeat Item’s Subject and Content → End Repeat. Remove any extra DuePair action outside the repeat, then tap the checkmark or Done.
DuePair notifies you after saving the draft; no extra Show Notification action is needed.
Step 12 of 12
Check that the subject contains “balance”, the receiving address is yours, and the actions include the repeat and DuePair.
Test with a new email. Saving the rule does not reprocess mail already in your inbox.
Send a new email from another mailbox to your receiving address. First check that it arrives in Apple Mail.
Subject: balance test

Body:
Test figurine: remaining balance 280.
Check the DuePair notification and Records → Drafts. One saved draft confirms the setup. Incomplete information is still kept for your review; delete drafts you do not need.
This example has no date. Review the amount and add the real dates before saving a tracked order and setting reminders. Receiving the same text again in a separate message should create another draft; you do not need to change the text.
Repeat the setup for each additional word. This guide does not repeat all the steps for every suggestion. Read the multiple-keyword section before adding overlapping rules.
Choose a priority order. For example, with “balance” and “figurine”, leave the balance rule’s exclusions empty and put “balance” in the figurine rule’s Keywords handled by other rules field. A message containing both goes to the balance rule.
For messages, Trigger matching text is the received message’s Content. For email, use Repeat Item’s Subject. Only exclude words handled by rules you have actually set up. Separate several custom exclusions with commas or new lines.
The Basic keywords selector contains fixed Simplified Chinese words. It does not automatically match their English translations. Use the text exclusion field for English words. For a single rule, leave both exclusion fields empty.
Save the rule with Run Immediately. A new message must match the keyword and any recipient or other filters. For email, check Apple Mail first; delayed delivery also delays the automation.
Check Repeat with Each and make sure the DuePair action is inside it, using Repeat Item. Passing the whole batch’s text directly to one action can combine emails.
Several keyword rules may match one message. System automation banners do not count DuePair drafts. Configure exclusions when using multiple rules, then check the draft count.
Check DuePair notification permission, Focus, and Scheduled Summary. Look in Records → Drafts rather than relying only on banners.
This tutorial uses Subject Contains, so a word only in the body will not trigger it. Once triggered, both the subject and body are passed to DuePair.
Open DuePair once, then search for SMS in Shortcuts. Check that your installed version includes this action.
Open it under Shortcuts → Automation and disable it. Choose Run Immediately to resume. Handle each rule separately if you have several.